Wednesday 2 September 2015

Turnip with pork ribs and dried clams + wolfberry soup

Whenever I boil turnip soup, I usually will but the slim type or turnip. Rather than the big size of turnip. And I love the turnip that still attach with the leaves. Normally I will wash and clean it and cooked together with the soup. Since I cannot find the dried octopus in my pantry, I substitute it with dried clams that we bought from Pulau Pangkor.

INGREDIENTS FOR TURNIP WITH PORK RIBS AND DRIED CLAMS + WOLFBERRY SOUP


500 gm - Pork Ribs
2 medium pieces - Turnip ( I use the organic turnip)
Some Dried Clams
Some Wolfberry/ Goji
2 pieces - Medium Red Dates
Water - Enough to cover all the ingredients
Salt

METHOD FOR COOKING TURNIP WITH PORK RIBS AND DRIED CLAMS + WOLFBERRY SOUP


1. In a hot boiling pot, blanched the pork ribs for 8 minutes. Rinse and drain the water and set aside.
2. Peel the skin of the turnip and cut into pieces. (This also apply with the turnip leaves) Wash and set aside.
3. Wash the dried clams for several times Soak the clams for 10 minutes.
4. Wash the red dates and wolf berry and set aside.
5. In a big pot, fill in water, pork ribs, turnip, turnip leaves, dried clams and red dates. Cook in high heat and after boiling, switch to medium heat and cook for 2.5 to 3 hours.
9. Add wolfberry and salt before serving.

TURNIP WITH PORK RIBS AND DRIED CLAMS + WOLFBERRY SOUP

TURNIP WITH PORK RIBS AND DRIED CLAMS + WOLFBERRY SOUP

TURNIP WITH PORK RIBS AND DRIED CLAMS + WOLFBERRY SOUP

This soup is very tasty and easy to prepare. This is the first time I use dried clams to cook this soup. Which makes the soup tastes more favourable and sweet.

Tuesday 25 August 2015

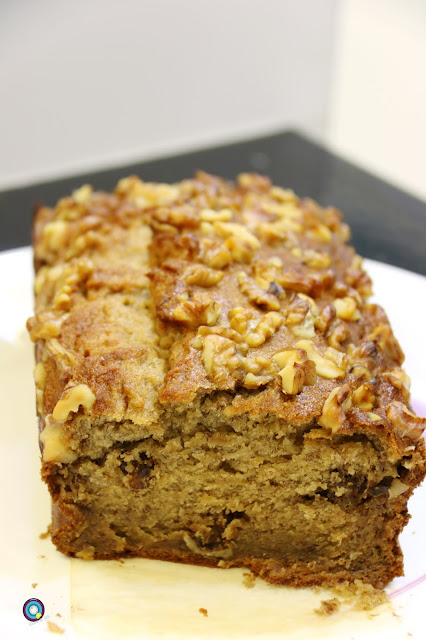
Banana Walnut Cake 香蕉核桃蛋糕

Whenever I came across any recipe that I think is a well keeper, I will just write down in a paper. Then the list became longer and longer. Today, I am going to blog about Banana Walnut Cake but I am not too sure where did I get the recipe from as I did not jog down the website. Not sure why I did not do that when I am writing down the recipe. Perhaps, I was in a hurry? Anyway, thanks for the kindly baker who shared the recipe. The following as below:

INGREDIENTS FOR BANANA WALNUT CAKE

100g - Butter
90g - Brown Sugar
2 pieces - Egg (lightly beaten with vanilla extract)
1 teaspoon - Vanilla Extract
320 gm - Mashed Ripe Bananas + 1 tbsp - Lemon Juice
125 ml - Plain Yogurt
100g - Cake Flour
90gm - Plain Flour
1tsp - Baking Soda
1 tsp - Cinnamon Powder
Coarsely Chopped Walnut

METHOD FOR BANANA WALNUT CAKE

1. Pre - heat the oven at 175C.
2. Line paper for the loaf tin. Then set aside.
3. Sift the cake flour, plain flour, Cinnamon powder and baking soda. Then set aside.
4. Cream the butter and sugar until light and fluffy with a electric hand mixer.
5. Beat in the egg mixture in 3 times till well blended.
6. Beat in the mashed banana and yogurt till well blended.
7. Fold in the sieved ingredients, in 3 times.
8. Pour the half batter into the prepared loaf tin.  Sprinkle some walnuts and then pour the rest of the mixture and top with walnuts.
9. Bake at oven for 50 minutes or until a cake tester came out clean. If top browns too quickly, cover with aluminium.
8. Remove from the oven and set aside.

Banana Walnut Cake 香蕉核桃蛋糕

Banana Walnut Cake 香蕉核桃蛋糕

Banana Walnut Cake 香蕉核桃蛋糕
Banana Walnut Cake 香蕉核桃蛋糕


Monday 24 August 2015

Dried Longan and Kidney Bean Soup 红豆龙眼汤

Actually, I don't really cook much of the Chinese desserts often. This is one of the day where I feel like having some red bean soup. So I decided to try the following recipe: 


INGREDIENTS FOR DRIED LONGAN AD KIDNEY BEAN SOUP


1 1/2 cup - Kidney Bean
1 piece - Dried Orange Peel
1/2 Cup - Dried Longan
3 pieces - Pandan Leaves
Some Rock Sugar (according to your taste buds)
Water (I usually will fill half of my pot with water)

METHOD OF COOKING DRIED LONGAN AD KIDNEY BEAN SOUP


1. Wash the kidney bean for few times and soak it overnight and set aside.
2. Wash the dried longan for few times and soak it for 30 minutes.
3. Wash the dried orange peel and set aside.
4. Discard the water from kidney bean and dried longan. Set aside.
5. Over high heat, bring the water and pandan leaves to boil.
6. Add kidney bean, dried longan and orange peel in the pot.  Cover and reduce to medium - low heat and simmer till the kidney bean are soft.
7. Add the rock sugar, then served.

Dried Longan and Kidney Bean Soup 红豆龙眼汤

Dried Longan and Kidney Bean Soup 红豆龙眼汤

Saturday 22 August 2015

Shark Fin Melon Soup with Corns

During one of our holiday trip to Cameron Highland in Pahang, we bought one shark fin melon and some sweet corns. It's been quite a long time that I did not cook shark fin melon soup. I remembered that I always cooked this soup when my princess is small. This soup is very sweet and tasty that came from shark fin melon and sweet corn. And off course with the helps of candied dates and pork ribs as well. I also added in some sweet almonds and bitter almonds that my mum bought me long time ago.

INGREDIENTS FOR SHARK FIN MELON SOUP WITH CORNS


500 gm - Pork Ribs
1/2 size of Medium Shark Fin Melon
2 pieces - Sweet Corn
2 pieces - Candied Dates
20 gm - Sweet Almonds
20 gm - Bitter Almonds
Water - Enough to cover all the ingredients
Salt

Shark Fin Melon Soup with Corns

METHOD FOR COOKING SHARK FIN MELON SOUP WITH CORNS


1. Remove the sweet corns from the sweet corn cob. Maintain the sweet corn cob. Wash and set aside.
2. In a hot boiling pot, blanched the pork ribs for 8 minutes. Rinse and drain the water and set aside.
3. Wash the  sweet almonds and bitter almonds and set aside.
4. Peel of the skin of the shark fin melon and cut into cubes. I remove the seeds from the shark fin melon as well.
5. In a big pot, fill in water, pork ribs, sweet corn, shark fin melon, sweet corn cob, sweet almonds, bitter almonds and candied dates. Cook in high heat and after boiling, switch to medium heat and cook for 2.5 to 3 hours.
6. Add salt before serving.

Shark Fin Melon Soup with Corns

Friday 21 August 2015

Lotus Root with Dried Octopus and Peanut Soup

Normally, I will cook my lotus root with carrot, red dates, pork ribs and wolfberry. Today, I will try another recipe which I came across in one of the soup cook book of my sister in law. I have made some changes with the soup as the following:

INGREDIENTS FOR LOTUS ROOT WITH DRIED OCTOPUS AND PEANUT SOUP


500 gm - Pork Ribs
500gm - Lotus Root
10 pieces - Chicken Feet
75gm - Peanut
Some Dried Octopus Head
Some Wolfberry/ Goji
2 pieces - Medium Red Dates
Water - Enough to cover all the ingredients
Salt

Lotus Root with Dried Octopus and Peanut Soup

METHOD FOR COOKING LOTUS ROOT WITH DRIED OCTOPUS AND PEANUT SOUP


1. Clean the chicken feet. Some of the chicken stall will help you clean the chicken feet. Chop of the and discard the tips of the claw (nail). Then set aside.
2. In a hot boiling pot, blanched the chicken feet for 5 minutes. Rinse and drain the water and set aside.
3. In another hot boiling pot, blanched the pork ribs for 8 minutes. Rinse and drain the water and set aside.
4. Peel the skin of the lotus root and cut into pieces. Wash and set aside.
5. Wash the peanut for several times and discard the rotten peanut. Soak the peanut for 10 minutes.
6. Wash the dried octopus head for several times Soak the octopus head for 10 minutes.
7. Wash the red dates and wolf berry and set aside.
8. In a big pot, fill in water, pork ribs, chicken feet, peanut, lotus root, dried octopus head and red dates. Cook in high heat and after boiling, switch to medium heat and cook for 2.5 to 3 hours.
9. Add wolfberry and salt before serving.

Lotus Root with Dried Octopus and Peanut Soup

Wednesday 19 August 2015

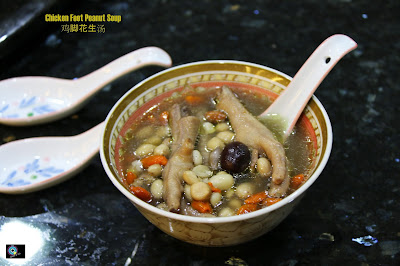
Chicken Feet Peanut Soup 鸡脚花生汤

Occasionally, I will cook some soup for my family. Actually my family members love soup very much. So from time to time, I will cook different kind of soup.
Today, I am going to blog about Chicken feet Peanut Soup which is high in collagen. This is actually my first trial of the soup and both hubby and princess love it very much and they reckon that I shall cook this soup more often.

INGREDIENTS FOR CHICKEN FEET PEANUT SOUP

1 piece - Chicken Maryland (Skin off)
500 gm - Chicken Feet
3/4 bowl - Peanut
Some Wolfberry/ Goji
4 pieces - Red Dates
Water - Enough to cover all the ingredients
Salt

Chicken Feet Peanut Soup 鸡脚花生汤

METHOD FOR COOKING CHICKEN FEET PEANUT SOUP

1. Skin off the Chicken Maryland and set aside.
2. Clean the chicken feet. Some of the chicken stall will help you clean the chicken feet. Chop of the and discard the tips of the claw (nail). Then set aside.
3. In a hot boiling pot, blanched the chicken feet and chicken maryland for 5 minutes. Rinse and drain the water and set aside.
4. Wash the peanut for several times and discard the rotten peanut. Soak the peanut for 10 minutes.
5. Wash the red dates and wolf berry and set aside.
6. In a big pot, fill in water, chicken maryland, chicken feet, peanut and red dates. Cook in high heat and after boiling, switch to medium heat and cook for 2.5 to 3 hours.
7. Add wolfberry and salt before serving.

Chicken Feet Peanut Soup 鸡脚花生汤

Normally, I will cook my soup using clay pot as I prefer the taste than cooking it using the stainless steel pot or pressure cooker. You will find it totally different in tastes.

Banana Walnut Blueberry Muffin

When I went to grocery shopping at Cold Storage, I saw that the blueberry was on sale. So I bought some and bake banana and blueberry muffin. Normally, I will wait for the banana skin to turn black as that is the best time for baking banana cake or muffins.

INGREDIENTS FOR BANANA WALNUT BLUEBERRY MUFFIN

75 g - Butter (Softened)
110 g - Brown Sugar
1 piece - Egg (Slightly beaten)
1 teaspoon - Vanilla Extract
1 1/2 cup - Plain Flour
1 tsp - Baking Powder
1 tsp - Bicarbonate Soda
135 g - Plain yogurt 
3 large ripe bananas
150g - Blueberries
Some toasted walnut
Some Caster sugar/icing sugar

METHOD FOR BANANA WALNUT BLUEBERRY MUFFIN

1. Pre - heat the oven at 190C.
2. Line muffin paper on the muffin tray. Then set aside.
3. Mashed the ripe banana with a fork and set aside.
4. Sieve the plain flour, bicarbonate soda and baking powder. Mix well then set aside.
5.  Beat the butter, vanilla extract and sugar until white and fluffy with a electric hand mixer.
6. Add egg and yogurt, beat well. 
7. Fold blueberries, mashed banana and walnut into the wet mixture.
8. Use a spatula combine the dry ingredients into the wet mixture until just blend.
9. Pour the batter into the prepared muffin tray. Sprinkle some caster sugar/icing sugar on top of muffin.
10. Bake at oven for 20 minutes or until a cake tester came out clean.
11. Remove from the oven and set aside.

Banana Walnut Blueberry Muffin
Before pouring into the muffin tray.
Banana Walnut Blueberry Muffin

Banana Walnut Blueberry Muffin
This is the first time I sprinkle some caster sugar on top of the muffin. It turn out to be nice and sweet on top of the muffin. It is a moist type of banana blueberry muffin.

Sunday 16 August 2015

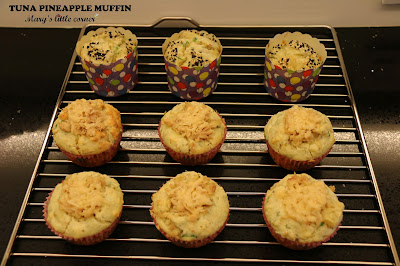
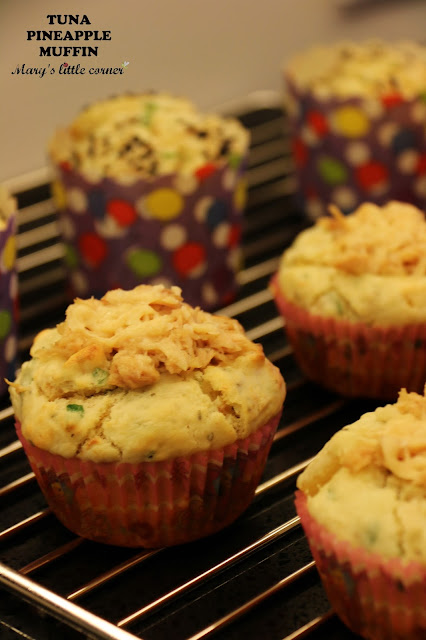
Tuna Pineapple Muffin

After baking twice savory muffin, I try baking tuna and pineapple muffin. The main reason is because I have both ingredients in my pantry The second reason because it would be nice for my princess to pack this for her breakfast the second day. Not to forget my hubby and my tea break snack too.
Tuna Pineapple Muffin

INGREDIENTS FOR TUNA PINEAPPLE MUFFIN

315g - All purpose flour (Plain flour)
4 tsp - Baking powder
125g (1 cup) - Grated cheddar ( I use about 3/4 cup)
1 tin - Ayam Brand Tuna Chunks in Olive Oil
Some dried oregano, rosemary and basil (depends your taste buds)
310ml (1 1/4 cup) - Milk
60g - Olive Oil
1 egg
400g - canned crushed pineapple, drained.
Some sesame seeds for decorating
Tuna Pineapple Muffin

METHOD FOR TUNA PINEAPPLE MUFFIN

1. Pre - heat the oven to 180C. Lightly greased muffin tray and set aside.
2. Sieve flour and baking powder into in a large mixing bowl.
3. Add 3/4 of cheese and 3/4 of tuna, dried oregano, rosemary and basil. Toss well to combine.
4. In another bowl, whisk together milk, oil and egg.
5. Make a well in the centre of the flour mixture and stir in milk mixture and pineapple until just combined. Do not over mix it.
6. Spoon mixture evenly into prepared muffin tray.
7. Bake for 20 minutes or until lightly golden.
8.Sprinkle the tops of the muffins with remaining tuna and cheese (I just sprinkle some sesame seeds in three muffins for trial).  Return to oven for 5 -8 minutes.
9. Cool in pan for 5 minutes, then transfer to a wire rack.

I still prefer the one top with tuna and cheese. It's very delicious. It's very easy to bake. Give it a try!

Sunrise at Gurney Drive, Penang.

Sunrise is very beautiful at Gurney Drive. I stopped by with hubby during one of the outing few days ago to capture the beautiful sunrise. There are some of others too, stopped their car , motor bike, bicycle and took some of the beautiful view.
Saw lots of people doing some exercise along Gurney Drive. And also saw grandpa sitting down reading newspaper. Some strolling with their dog too.
Following were some of the view that I took during one of the outing lately:

 Sunrise at Gurney Drive, Penang.

Sunrise at Gurney Drive, Penang.

Sunrise at Gurney Drive, Penang.

Sunrise at Gurney Drive, Penang.

Sunrise at Gurney Drive, Penang.

Sunrise at Gurney Drive, Penang.
Beatiful Sunrise at Gurney Drive, Penang.

Thursday 13 August 2015

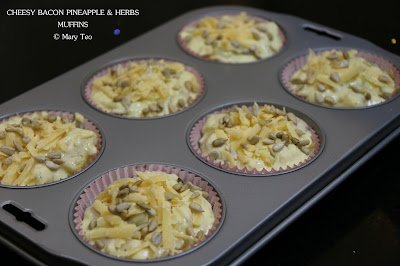
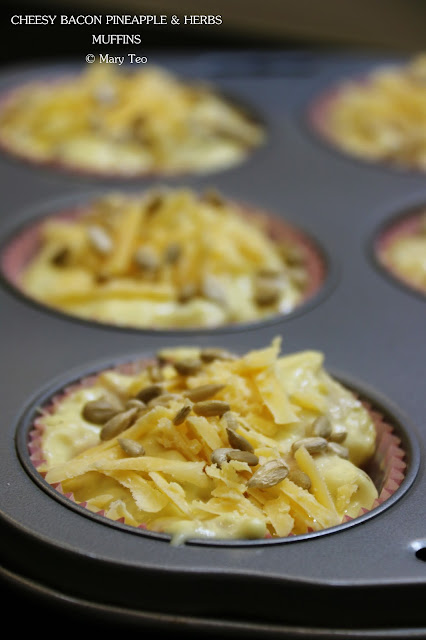
Cheesy Bacon Pineapple & Herb Muffins

After the first trial of the savory muffins, I decided to try another recipe again which I modified some changes. This is because I ran out of ham in my fridge so I substitute with bacon.
It was equally nice the second day. I packed some for my tea break at work on the second day. I love the pineapple that add into it and the chunky bacon. With the nice herbs aroma which makes my day.

INGREDIENTS FOR CHEESY BACON PINEAPPLE AND HERB MUFFINS

315g - All purpose flour (Plain flour)
4 tsp - Baking powder
1 tsp - Salt
125g (1 cup) - Grated cheddar ( I use about 3/4 cup)
200g - Chopped bacon
1 tablespoon - Caster Sugar
Some dried oregano and basil (depends your taste buds)
310ml (1 1/4 cup) - Milk
4 tablespoon (60g) - butter, melted (I use olive oil)
1 egg
400g - canned crushed pineapple, drained.
Some sunflower seeds 
Cheesy Bacon Pineapple & Herb Muffins

METHOD FOR  CHEESY BACON PINEAPPLE AND HERB MUFFINS

1. Pre - heat the oven to 180C. Lightly greased muffin tray and set aside.
2. Sieve flour, baking powder and salt into in a large mixing bowl.
3. Add half of the cheese and all the ham, sugar, dried oregano and basil. Toss well to combine.
4. In another bowl, whisk together milk, oil and egg.
5. Make a well in the centre of the flour mixture and stir in milk mixture and pineapple until just combined. Do not over mix it.
6. Spoon mixture evenly into prepared muffin tray. Sprinkle remaining sunflower seeds and dried oregano and basil on top.
7. Bake at oven for 20 minutes or until cake tester came out clean. 
Cheesy Bacon Pineapple & Herb Muffins
Cheesy Bacon Pineapple & Herb Muffin

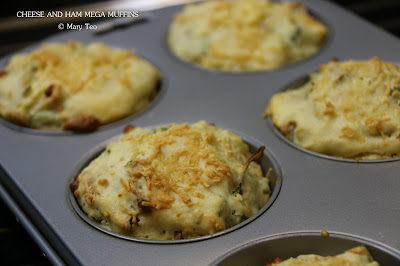
Cheese and Ham Mega Muffins

I have bake many different kind of  muffins but never try baking any savory muffins before. I came across this recipe from one of my cooking book. The title of the book is CUPCAKE & MUFFINS. I bought it in one of the year end Popular sale. There are over 100 recipes in it. 
I flipped through the book and saw the following Cheese and Ham Mega Muffins recipe. I check the ingredients and basically I have them all. So I start baking. 

INGREDIENTS FOR CHEESE AND HAM MEGA MUFFINS

250g - All purpose flour (Plain flour)
2 tsp - Baking powder
1/4 tsp - Salt
125g (1 cup) - Grated cheddar ( I use about 1/2 cup)
80g (80g) - Chopped ham
50g (1/3 cup) - sun dried tomatoes (I use around 25g and I cut it into strip)
3 tbsp - Chopped Parsley 
250ml (1 cup) - Milk
60ml (1/4 cup) - Olive oil
1 egg, beaten

METHOD FOR CHEESE AND HAM MEGA MUFFINS

1. Pre - heat the oven to 180C. Lightly greased muffin tray and set aside.
2. Sieve flour, baking powder and salt into in a large mixing bowl.
3. Add three-fourths of the cheese and all the ham, sun dried tomatoes and parsley. Toss well to combine.
4. In another bowl, whisk together milk, oil and egg.
5. Make a well in the centre of the flour mixture and stir in milk mixture, until just combined. Do not overmix it.
6. Spoon mixture evenly into prepared muffin tray. Sprinkle remaining cheese on top. 
7. Bake at oven for 20 minutes or until cake tester came out clean.

Cheese and Ham Mega Muffins
 Just before I sent my muffins into the oven.
Cheese and Ham Mega Muffins

CHEESE AND HAM MEGA MUFFINS

I have made some adjustment with the ingredients like cheese as I worried that my muffin will came out too cheesy. And I cut down the dried tomatoes too as not sure how it tested if too many sun dried tomatoes in it. Therefore you can see that my cheese and ham mega muffins are not that creamy. I have done this just in time for lunch and brought some over to my sister in law office for her lunch. She reckon that it tastes nice. However, I will add more cheese next time if I would like to do this again.

* Please note that step 3 is very important. Make sure that the flour mixture are well combined with the ham, sun dried tomatoes and parsley. Toss well.

Wednesday 12 August 2015

Maung Bean and Organic Barley 绿豆薏米

It's been quite a long time that I did not cooked maung bean as my hubby did not really like maung bean. As for my family, I can recall, maung bean is one of the food my family always cook. Which my family believe that maung bean will have the cooling effect for our body. 
My family usually just boil the maung bean and add the sugar into it. That's simple. And at my mum, sisters and brother place, it's easy you can see a packet of maung bean lying in their pantry. 
Whenever I told my mum I am having sore throat or when my princess having fever, she will surely ask me to boil the herbal tea or make some maung bean for the family.
Few days ago, I had some terrible sore throat. Having manuka honey and honey drinks to subside the sore throat, I decided to boil myself some maung bean. Then I browse through the internet, I saw some people also add in barley. Therefore, for a change I add some barley into this dessert.

INGREDIENTS FOR MAUNG BEAN AND ORGANIC BARLEY

1 cup - Maung Bean
1/2 cup - Organic Barley
Some Rock Sugar (according to your taste buds)
Water (I usually will fill half of my pot with water)

METHOD OF COOKING MAUNG BEAN AND ORGANIC BARLEY

1. Wash the maung bean for few times and soak it for 30 minutes and set aside.
2. Wash the organic barley for few times and soak it for 30 minutes.
3. Discard the maung bean and organic barley after 30 minutes.
4. Over high heat, bring the water, organic barley and maung bean to boil. (uncover)
5. Cover and reduce to medium - low heat and simmer till the maung bean and barley are soft.
6. Add the rock sugar, then served.
Maung Bean and Organic Barley 绿豆薏米
You can served this bowl of dessert either hot or cold. I was surprised that hubby and my princess is taking this dessert this time round. I think they started to appreciate the goodness of maung bean and organic barley dessert.

Tuesday 11 August 2015

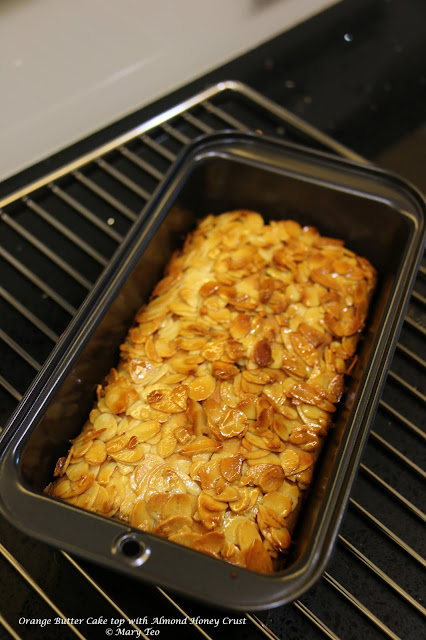
Orange Butter Cake top with Almond Crust (蜂蜜杏仁香橙奶油蛋糕)

I love almond flakes very much. Sometime I just toasted in the oven for a few minutes and sprinkle on top of the salads. Love the textures. While surfing the net for recipe, I came across this Orange Butter Cake top with Almond Crust recipe by Nasi Lemak Lover. 
After browsing through the recipe, I went to my pantry and fridge to search for the ingredients. 
"Yes......... I shouted in my heart." I can bake this cake for my afternoon tea time. 
Please pop over to the original recipe, here.
Orange Butter Cake top with Almond Crust (蜂蜜杏仁香橙奶油蛋糕)

Orange Butter Cake top with Almond Crust (蜂蜜杏仁香橙奶油蛋糕)

Orange Butter Cake top with Almond Crust (蜂蜜杏仁香橙奶油蛋糕)

INGREDIENTS FOR ORANGE BUTTER CAKE

125g - Butter
90g - Sugar (I use brown sugar)
2pieces - Egg
1/2 teaspoon - Vanilla Extract
125g - Cake Flour
1/2tsp + 1/4tsp - Baking Powder
4 tbsp - Freshly Squeeze Orange Juice
1 tsp -  Orange Zest

METHOD FOR ORANGE BUTTER CAKE

1. Pre - heat the oven at 170C.
2. Line paper for the loaf tin. Then set aside.
3. Sift the cake flour and baking powder. Then set aside.
4. Beat the butter, vanilla extract and sugar until white and fluffy with a electric hand mixer.
5. Add one egg at a time. Beating well after each addition. After well combined increased speed and beat for 1 minute till fluffy.
6. Pour the batter into the prepared loaf tin and slightly tap the loaf tin to release the air bubbles.
7. Bake at oven for 30 minutes or until a cake tester came out clean.
8. Remove from the oven and set aside.

INGREDIENTS FOR HONEY ALMOND CRUST

60g - Almond Flakes
25g -  Honey
15g - Butter

METHOD FOR HONEY ALMOND CRUST

1. Set the oven temperature to 180C.
2. In a small saucepan, melt butter and honey at low heat. Stir occasionally. After combined remove from stove.
3. Pour almond flakes into the butter honey mixtures and make sure the almond flakes are well coated with the mixtures.
4. Place the honey almond crust evenly spread on top of the cake. Then return the cake to oven and bake for 8 - 10 minutes or until the honey almond crust turn golden brown.
5. Remove the cake from the oven, let the cake cool down completely before slicing.

This cake is very popular in my family. Especially my hubby, I think it will be gone in a short while. I personally think that it is best to consumed on that day when the almond flakes still crunchy. The cake itself is quite moist. Sorry for the slightly burnt honey almond crust. This is one of the good recipe to keep.

Blueberry Cheese Tart

I am not a certified nor qualified baker. I just love to play around with flour. Occasionally, my hand will feel itchy after browsing through many recipe. I will start baking. Actually I bake with my mood. When my baking mood is back, I can bake every day but when the strong winds blown away my mood, I can stop baking for months. Hahaha........ that's me!
Following were just the blueberry cheese tart that my friend shared with me few years ago. She baked the cheese tart for her eldest daughter charity fun raising at school. I did not have the chance to savour her piece of cheese tart as all sold out during the food charity fair. So my dearest friend gave me a link for this recipe, here.
I love GS Kitchen Mini Cheese Tart recipe as I love the cheese filling where she added lemon juice on it. So the cheese tart came out to be nice. I made some minor changes in the recipe and method for this blueberry cheese tart.

Blueberry Cheese Tart

INGREDIENTS FOR PASTRY

150gm - Cold Butter (Cut into cube)
50gm - Caster Sugar
2pieces - Egg Yolk
1/4 teaspoon - Vanilla Essence
250gm - Plain Flour (Sieved)

Blueberry Cheese Tart

METHOD:

1. Pre-heat the oven at 170C. 
2. Sieve plain flour and put aside.
3. Beat cold butter and caster sugar to become pale in colour. Add in egg yolk and beat thoroughly.
4. Fold in sieve flour and mix into the dough. (If the dough is too sticky, you can pop into refrigerator for 15-20 mins).
5. Divide the dough into small balls that can fit in your tart shell case. Slowly press the dough into the dough to clockwise direction and trim off the excess dough.
6. Use fork/satay stick to prick few hole.
7. Place the tart shells into the pre-heated oven and bake for 25 minutes.

INGREDIENTS FOR CHEESE FILLING

250gm - Cream Cheese
50gm - Butter (at room temperature)
60gm - Icing sugar (I use caster sugar)
1 piece - Egg
1 tablespoon - Lemon Juice
100gm - Whipping Cream (Cold)
Blueberry Jam (Some)

METHOD FOR CREAM CHEESE FILLING

1. Pre-heat the oven at 160C. 
2. Beat cream cheese, butter and sugar until fluffy. 
3. Add in lemon juice and beat until smooth. 
4. Add in egg and beat till combine thoroughly. Then put aside.
5. In a clean bowl beat whipping cream till stiff. Then mix the whipping cream to the cheese mixture till combine (just use spatula).
6. You can use pipping bag to pipe the cheese batter into baked shell tart. However, I just use spoon to scoop the cheese batter to the baked shell tart.
7. I filled half of the tart with cheese batter and I add 1 teaspoon of blueberry jam into it. Then cover the cheese batter to fill the tart.
8. Place the cheese tart into the pre-heated oven and bake for 15 minutes.
9. Leave the cheese tarts to cool before keeping them in fridge.
10. After few hours chilling, ready to be served.
Blueberry Cheese Tart
Mary's style of Blueberry Cheese Tart
This cheese tart is a good keeper. It can store for many days in the fridge with airtight container. I do some purely cheese. As sometime my princess will shredded some chocolate and put on top of the cheese tart. 
Blueberry Cheese Tart
Interior of the blueberry cheese tart.
Cheese Tart with sweet relish
I would like to try out the sweet relish from a friend as a souvenir. So I put one tablespoon to try it out. Well, I still prefer the normal blueberry cheese tart.

Blended Pitaya (Dragon Fruit) with Carrot Juice

If you stay in Malaysia, I think majority of people would know this fruit. Basically, it has only two types of pitaya I consume so far. It is either white in flesh or dark pink in flesh. But I was learnt that there is a yellow flesh too in other country.
Pitaya was also named as dragon fruit and in Chinese they named it 火龙果 or 龙珠果. Initially, we start with the white flesh pitaya. Normally, we will not take the pitaya straight after we buy them. We will usually store it away for few days before we consume. As the longer it store, we feel that it will taste sweeter.
Then came the dark pink flesh of dragon fruits. Actually my family does not like the dark pink flesh of dragon fruit. As it will make your hand, teeth and tongue to turn in dark pink colour. It actually annoyed me at first. Then we stopped taking the dark pink flesh of dragon fruit. But during one occasion, my sister in law bought the dark pink flesh of dragon fruit and share it with us. After that day onwards, we start to love it since then.
Normally, we will just cut and eat it as after meal fruit. And occasionally will blended as a juice. 
Today, I just want to share with you the simple:

Blended Pitaya (Dragon Fruit) with Carrot Juice


Blended Pitaya (Dragon Fruit) with Carrot Juice

Blended Pitaya (Dragon Fruit) with Carrot Juice

Ingredients:

1 Piece -  Pitaya (dragon fruit) about 650gm
1 Cup - Cold Water 
1 Piece - Medium Size Carrot
Ice - cube (optional)

Method:
1. Peel of the carrot and cut the carrot into small pieces. Set aside.
2. Cut the pitaya into half and take out the dark pink flesh. Cut into cube. Set aside.
3. Put cut carrot, pitaya and cold water into a blender and blend until smooth.
4. Serve while it still chilled.